I'm a fan of the Spritz "Redicle" for quickly reading through long pages of text. I even posted one of my novels for reading with Spritz. Now they have a tool they call Spritzlet that can be used to read any webpage using Spritz technology. Check it out at Spritzlet.
Be sure to expand the articles that you want to read on this site before you open Spritzlet, otherwise it will only read the introductory paragraphs.
Flare 11 and Foundation
by Todd Phillips, published 8 April, 2015
Figures. Just when I got comfortable with Skeleton, I got interested in Flarestrap and began learning Bootstrap. Now that I've gotten comfortable with Bootstrap, MadCap releases Flare 11 which leans on Foundation to create their new HTML5 Top Navigation skin. Now I'm digging in to Foundation. Sigh.
Foundation is another grid-based framework for designing modern web pages, similar to Bootstrap or Skeleton. Learning Foundation, if you are familiar with the others, will be a simple matter of learning a different set of class names. I can't really back up the opinion, but so far I feel that Foundation is easier to learn than Bootstrap was. Zurb did an excellent job of creating Foundation, and I think MadCap made a smart choice picking Foundation to build out it's Top Navigation skin.
The TopNav skin is perhaps the biggest news in Flare 11 as it gives you the tools to build the grid based pages that Flarestrap created right in the product with no additional code magic behind the scenes. But learning the behind the scenes coding possibilities of Foundation will let you expand Flare 11 even farther. Two such techniques I've used already are the Magellan Sticky Nav Bar and the Foundation Icons.
The Sticky Nav Bar is a horizontal navigation list that stays at the top of the browser window as you scroll and highlights the menu entry that corresponds to the page section you're scrolling through. Very useful little bit of eye-candy for your long pages, especially if you have a lot of pages with the same headings. I'm working on an API catalog project where I have several hundred command reference pages, and each page has the same sections. It wasn't to difficult to insert the necessary code into each page to add the sticky nav bar.
The Foundation Icon set is a less obvious addition to my project, as I'm really only using it to provide the image of an up-arrow for my links to the top of the page. But rather than loading a graphic I can simply insert an i tag with the ID of the icon I want. All of this depends on linking to the appropriate CSS file and then setting the class of the tag to match the name of the icon I want. It ended up being a very short piece of code:
Adding the fonts to my Flare 11 project was a two-step process. First, I copied the font files and the foundation-icons.css file to a folder at the same level as my resources folder and topic folders and cleverly named the folder "css". I used this folder because I had already created it to hold the Foundation CSS files when I added the Magellan Sticky NavBar. The second step was to add a link to the CSS file in my OtherTopics.flmsp file. Then I could add the code snippet above to any project page that used this master page and the icon would be displayed. Simple. Which means it took a little while to figure out. (smile)
Adding Bootstrap Tabs in Flare
by Todd Phillips, published 4 February 2015
Recently, I've been working hard to master the use of the Bootstrap framework within MadCap Flare using the Flarestrap project. This has been a big learning curve for me, because I typically publish in PDF first and HTML 5 as a secondary channel. The API documentation project I'm working on is just the opposite; we're publishing first in HTML 5 and offering a PDF download as a secondary option.
Flarestrap has offered a significant upgrade to the functionality available within Flare, especially as regards the responsive output. Bootstrap is first and foremost a responsive framework. It works as well on a phone as it does on a desktop computer. This was a 'nice to have' requirement for the API project, but something I wanted to achieve.
My latest task was to find a way to accomodate a piece of feedback from a developer. He loved the overall look of the new site I'm building with Flare and Bootstrap, but noted that our API commands can return output in three different formats: XML, HTML, and Text. Wouldn't it be cool, says he, if we included all three outputs on tabs in the samples? I had to agree, it would be cool but could I do it?
This was my first encounter with a problem in the Bootstrap documentation. It's possible that the problem was simply my understanding of the documentation, I admit, but it seemed that the three different pages I found that discussed adding tabbed content contradicted each other. I think they were simply giving different variations of how it could be done, but I was confused. My first implementation failed, which wasn't a big surprise when trying something new. The tabs worked, but the second and third tabs failed to display content (or so I thought). It turned out they were displaying the content, but they weren't displaying as tabs, but rather making the content either hidden or displayed based on the click, with white space showing when the content was hidden. I had a good chuckle over that one.
After fooling around with scraps of Javascript, I had to reconsider basics. The Javascripts that are part of Bootstrap contain the functions to handle tabs, so there was no need to include them in the page. I simply needed to identify the tabbed navigation list and the divs for each tab pane. Once I got it working perfectly, I made the following template to make it easy to copy and paste into the page code view in Flare.
                    <!-- Begin tabs for sample code -->
                    <div role="tabpanel">
                        <!-- begin tab nav -->
                        <ul id="myTab" class="nav nav-tabs" role="tablist">
                            <li role="presentation" class="active"><a href="#xml" aria-controls="xml" role="tab" data-toggle="tab">XML</a></li>
                            <li role="presentation"><a href="#html" aria-controls="html" role="tab" data-toggle="tab">HTML</a> </li>
                            <li role="presentation"><a href="#text" aria-controls="text" role="tab" data-toggle="tab">Text</a> </li>
                        </ul>
                        <p> </p>
                        <!-- begin tab content -->
                        <div class="tab-content">
                            <div role="tabpanel" class="tab-pane fade in active" id="xml">
                                <!-- insert XML sample here -->
                            </div>
                            <div role="tabpanel" class="tab-pane fade" id="html">
                                <!-- insert HTML sample here -->
                            </div>
                            <div role="tabpanel" class="tab-pane fade" id="text">
                                <!-- insert text sample here -->
                            </div>
                        </div>
                    </div>
                    <!-- tabs end -->
For each topic (approximately 430 for this project) I paste this block of template code into the appropriate spot using the Code Editor view in Flare and in the XML Editor I customize each pane with the code samples. In my case, I already have the XML samples in the topics, so I cut the section in the Code Editor and then paste it three times (once per pane). The last step for me is to paste in the new sample output over the XML sample. Once I did this a few times it became almost mechanical. And while this is a tedious task to repeat over 400 times, it has already let me identify a few commands that had broken samples. All in all, a nice feature to add and an overall improvement in quality.
Feel free to use my template if it helps you. Customize the id tags for the content divs, and make sure that the hrefs point to those ids. The initialization is taken care of by Bootstrap (you did include the calls to both JQuery and Bootstrap, didn't you?) so as long as you use this format it should work. One other note, the fade class tells the panel to fade out and fade in when changing between tab panes. It is optional, but adds a little interest in my opinion.
Multi-select in Brackets
by Todd Phillips, published 9 December 2014
Have you ever had a small bit of text or code that needs to be inserted at the beginning of several paragraphs? You type the fragment once, select it, copy it, and then proceed to paste it in several places while hoping the mindlessness of the task won't cause you to make a stupid mistake. Have you wanted an easier way?
I recently found myself in this very situation, sighing at the dull repetition. Until I made a discovery.
Apparently, someone at Adobe has had the same complaint, that same "OMG I wanna gouge my eyes out cuz I'm so bored!" angst while inserting a fragment of text or code into multiple lines at once, because they have added a wonderful function to Brackets. Multi-select and paste. I discovered this while converting a block of plain text into properly formatted paragraph blocks. I was pasting the <p> tags into place at the beginning of multiple spots in a document when I happened to leave my finger on the Command key while selecting spot after spot and pasting the tag. What appeared was something similar to this:
Each location where I repeated the click and paste had an extra tag. Hmm, this would only happen if I could multi-select and past in non-contiguous blocks. (Isn't it amazing what writers will geek-out about?) I tested the theory and discovered that you can, in fact, select multiple insertion points by holding the Command key (on a Mac, Ctrl on Windows) and clicking each insertion point. You can then paste once and insert the same fragment in every insertion point.
If you find yourself needing to paste the same fragment of text into multiple locations within Brackets, you can use the steps below.
To paste a fragment of text to multiple locations in a document:
Select the text fragment to paste. For this technique, the fragment must be identical in each destination.
Copy the text using your favorite method (Command+C on a Mac, Ctrl+C on Windows, or menu command).
In the destination document, hold the Command key (on Mac, Ctrl key on Windows) and single click in each location where you want the fragment to appear.
Once all are selected, paste once (Command+V on Mac, Ctrl+V on Windows) and the text is inserted in all selected locations with a single paste action.
Adobe Releases New Code Authoring Tool
by Todd Phillips, published 6 November 2014
I was reading through LinkedIn the other day and one of the managers at the company where I work posted an article talking about Adobe's newest foray into the code authoring world: Brackets. Most technical writers are also closet coders. For all the time we need to get down into the nitty-gritty of HTMl, XML, and XHTML, we pick things up. And a good code authoring tool is valuable when you find yourself working between the tags.
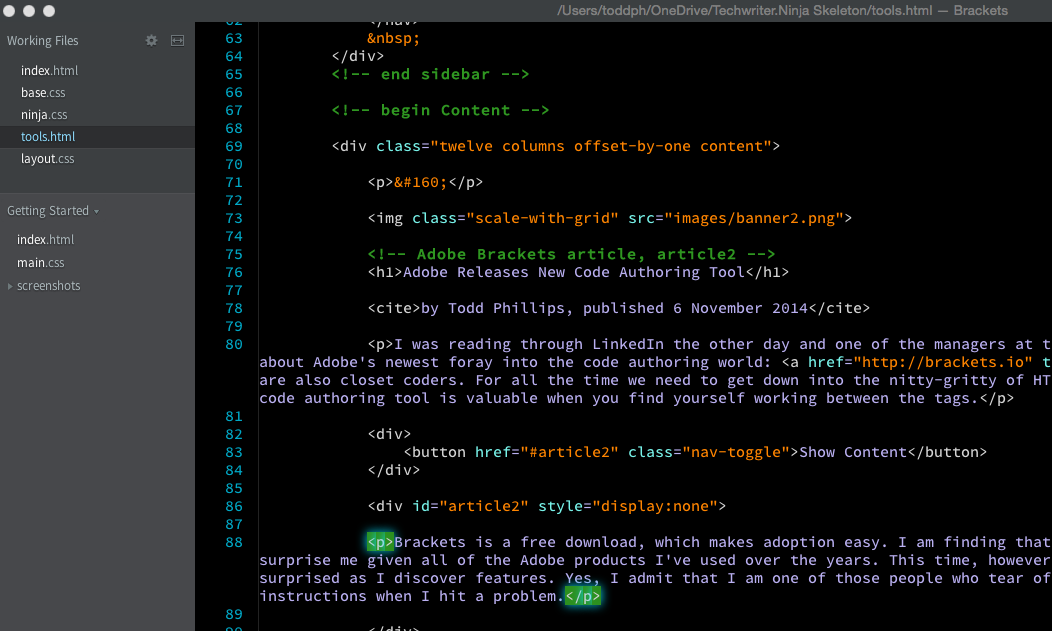
Brackets is a free download, which makes adoption easy. I am finding that there is a mild learning curve, which didn't surprise me given all of the Adobe products I've used over the years. This time, however, I find myself constantly feeling pleasantly surprised as I discover features. Yes, I admit that I am one of those people who tear off the shrink wrap and dive in, only reading the instructions when I hit a problem. At first blush, Brackets reminded me a lot of Sublime, or other text editors, until I started working with some HTML.
The main window of Brackets on my MacBook Pro
Brackets has many features folded in that replace extensions that I've used. If you choose the default download option now, you will receive Brackets with Extract, which lets you view style information ala Firebug directly into the editor in real time. The real time Live Preview feature is another tool I have been making extensive use of while I tweak the stylesheet.
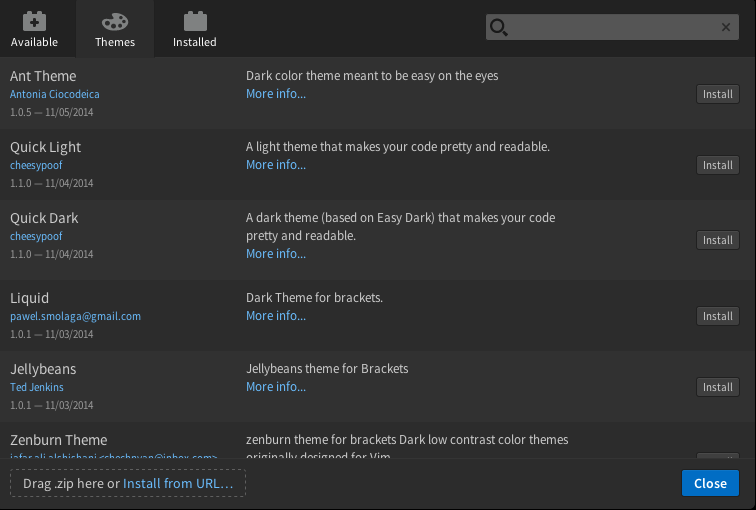
The user interface is minimal and does a great job of staying out of your way. There are numerous themes available to set the colors to best suit your personal style and working environment. I love the way Brackets looks virtually identical on Windows and Mac, which makes it easy for me to move from one computer to another and keep working with the same familiar tool. When you want to extend Brackets, the Extension Manager feature will let you easily locate and install extensions and themes.
The Extension Manager helps you locate and install new goodies for Brackets
In case you're curious, I'm using the Nature theme as I have a relatively dark environment where I am typically working and I enjoy some color in the interface. The nuclear-green glow of the enclosing tags as I write is making life just a little harder than it needs to be, so I may just be exploring other themes soon.
Cloud-Based Source Control for MadCap Flare
by Todd Phillips, published 20 May 2014
I work in a small group of writers surrounded by Agile developers. Thank you for your condolences, they are appreciated. The development teams have a locally implemented source control architecture utilizing Microsoft Visual Studio and Team Foundation Server (TFS). Madcap Flare supports TFS for source control, however, my colleagues seem to think that letting the unwashed hordes of barbarian writers in to their inner sanctum would cause reality-tearing consequences. For the record, writers are very good at personal hygiene, thank you very much. Still, the lack of welcome into the TFS server meant that I had to locate another viable option for source control and disaster recovery.
There are many free and inexpensive options out on the interwebs today, and it wasn't long before I had settled down to try out CloudForge for Subversion support in a free account. the free account includes your choice of Subversion (SVN) or Git for source control, and also includes a wiki and ticket system for tracking bugs and tasks. All I was really concerned about, however, was that it was cheap (free) and that it was cloud-based and guaranteed to be available and resilient to failure. This gave me the benefit of knowing my Flare projects were stored securely offsite, backed up, and could be accessed easily from anywhere provided I had an Internet connection. Very helpful when using a personal laptop from home to access a work project for a quick fix.
CloudForge has actually saved my proverbial bacon when I encountered local file corruption that destroyed part of my project. A couple of these incidents happened not long after installing Flare 10, when Flare was very temperamental and decided to crash, taking several topics in the current project into oblivion. When I restarted that application I experienced the horror of seeing several hours worth of work missing from the Content Explorer pane. Refreshing the files from source control was all that was required and the only lasting damage were the changes made since the last check-in.
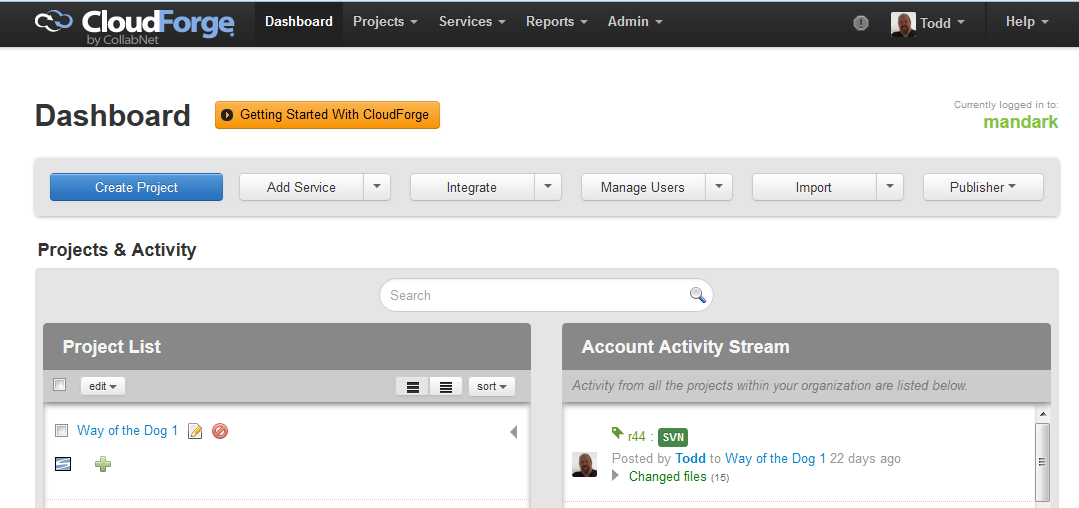
When you sign-up for a Cloudforge account, they will create a central dashboard for your account similar to the following graphic.
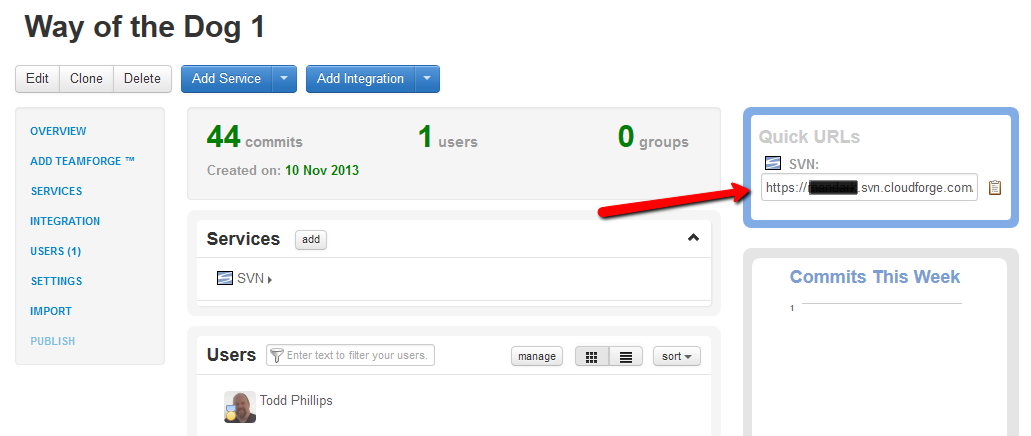
Once you have your dashboard, you can create multiple projects and manage their services. You can add Subversion or Git to your project for source control. I use Subversion because it integrates naturally with Flare. All that Flare needs to connect to your Cloudforge project is the URL and the credentials. You can get the URL from the main dashboard page for the project, as shown in this graphic.
Just copy the SVN URL under Quick URLs to give it to Flare.
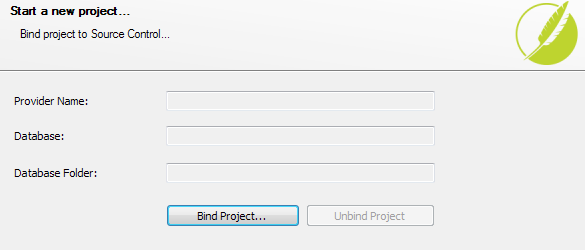
In Flare, you can work with Cloudforge SVN in a couple ways. First of all, you can bind to SVN while creating a new project. To do this, on the page where you define the name and working folder for the project click the Bind to source control at the bottom of the page. This will cause the page shown in the following graphic to appear.
Click Bind Project, and then in the Server text box, copy in the URL to your SVN project. Click Browse to locate a folder in which your project will be placed. I typically just select the root folder and Flare creates a new subfolder with the same name as the Flare project.
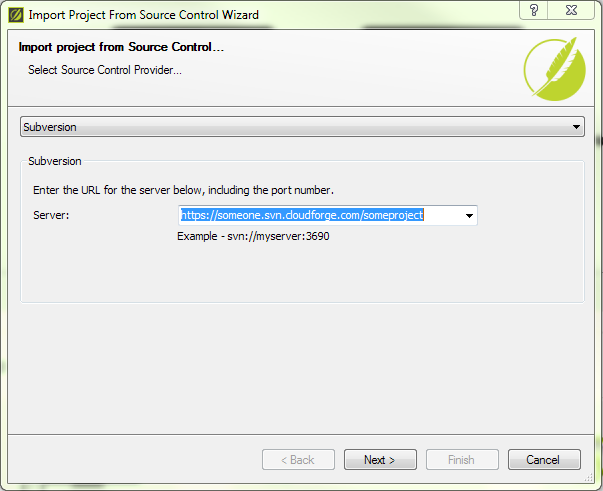
The other way of working with cloud-based SVN is to import a project from SVN into Flare. I have found this to be very helpful when working from home. I can use the Source Control Import wizard to download a local working copy of a Flare project onto my personal laptop to keep working on files at home.
To import an existing Flare project from source control, under the File menu, click Source Control, and then click Import Project. In the Import Project from Source Control wizard, pick the type of supported source control from the drop-down list and then copy in the URL to your project, as shown in the following graphic.
Once you've entered this information and clicked Next, you are prompted to browse for the project to import and to define a location for your local working copy. If you can, try to define the same relative path on this computer as you use on the computer on which you created the project, it will lessen potential headaches later. From here on, working with a cloud-based source control engine is exactly like using Flare with a local source control engine. Flare will automatically check out files for you when you save changes. When you are done working, simply go to the Source Control menu/ribbon and check in your files.
 Subscribe to the RSS feed
![[Valid RSS]](/images/valid-rss-rogers.png "Validate my RSS feed")